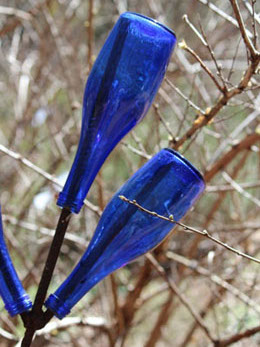
Are you are willing to display creativity and contribute to the dying tradition of making an artificial bottle tree? Then go through the following content to know how to make a bottle tree.

The concept of the bottle tree originated in the Congo region of Africa. It was believed that by hanging blue-colored bottles from trees and huts, the evil spirits got trapped inside the bottle and could not find their way out. According to legend, when the breeze blows past the bottles, you can hear the moaning of the trapped evil spirits. The practice of making these trees was spread by the African slaves to Europe and North America. Hanging bottles in trees became a popular garden decor idea in the southern states of North America, where they continued with the tradition. Today, trees with hanging bottles are used as colorful garden ornaments. These trees can be created in many creative ways.
Making a Bottle Tree
For the materials, you need to have a tree trunk, a branch, or a large dowel for the trunk in order to make a bottle tree. If you do not have a tree trunk in your backyard, you can move around the local countryside or request your neighbors who may have recently cut down a tree. After getting the stump, you will need a drill, hammer, nails or screws, and different varieties of bottles.
Which Bottle to Use
It is important to decide upon which bottle to use, as it will help you to know the length of nails and screws you need, and how deep to install them into the tree stump. There is no hard-and-fast rule about decorating the entire tree stump with bottles of the same color; you can be creative and experiment with different sizes, colors, and types of bottles.
Installing the Nails
It is the most important task in making a bottle tree. You have to drive the nails or screws at an angle in such a way that they are not lined up in a row and are not touching each other. So, make sure that the nails or screws are staggered and far enough from each other to get the desired look for the tree stump.
Slip on Your Bottles
Once your tree is ready, start slipping on your bottles on the ends of the branches. At this stage, you will have to do some adjustment to achieve the coordinated look. You can use any type of bottles. Keep your eyes open for interesting bottles and add them to your tree. You can also ask your friends and co-workers to donate their empty bottles.
Adjustment and Adding Bottles
Now that your bottle tree is completed, it is time to play around where you can adjust the spacing between the bottles or add new bottles onto the tree. This will help in enhancing the overall structure of the tree.
Enjoy your Bottle Tree
Bottle trees are an interesting expression of art where you can explore your creativity. When involved in making this type of tree, you can try recycling products and used bottles for environment-friendly decorations. These trees can make a great gift and a marvelous yard decoration.
Wine Bottle Tree
Do you enjoy drinking wine, but don't know what to do with all those empty wine bottles? You can convert them into gorgeous wine bottle lamps or make a toy house out of them. But if you are interested in doing something which is simple and decorative, why not try a wine bottle tree?


 The concept of the bottle tree originated in the Congo region of Africa. It was believed that by hanging blue-colored bottles from trees and huts, the evil spirits got trapped inside the bottle and could not find their way out. According to legend, when the breeze blows past the bottles, you can hear the moaning of the trapped evil spirits. The practice of making these trees was spread by the African slaves to Europe and North America. Hanging bottles in trees became a popular garden decor idea in the southern states of North America, where they continued with the tradition. Today, trees with hanging bottles are used as colorful garden ornaments. These trees can be created in many creative ways.