

Outdoor Wall Fountains
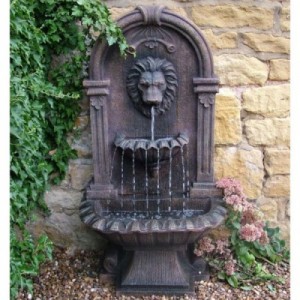
Wall fountains, particularly those disguised as masks and gargoyles, have a long tradition of use throughout the gardens of Europe, and modern versions abound in garden centres. All produce a jet of water from a wall, which flows into a raised or sunken basal pool, bowl or dish and is recirculated back to the spout. They are extremely versatile features, often allowing moving water to be introduced to a tiny or enclosed garden in a grander fashion than is possible with a conventional pool and fountain.
 Masks and gargoyles are available in a wide range of shapes and sizes, being made from such diverse materials as real or imitation stone, lead, terracotta, fibreglass or plastic. In many cases, the more artificial materials are quite convincing in their appearance and, additionally, are often much easier to install.
Careful thought must be given to the manner in which an outdoor wall fountain will function. It will be operated by a submersible pump, but installing the pump in a shallow pool or bowl at the base of the wall may be undesirable, or even impractical.
The water level may be too low, or the pump too obtrusive. Therefore, it is better to make other arrangements, which must be carefully thought out before construction or fixing the wall fountain begins.
Placing the pump in a sump outside the pool is the best option. This must be as close to the wall fountain as possible to prevent the output from being reduced by excessive lift or length of delivery hose. It must he accessible for maintenance and can often be concealed beneath a removable slab in the paving around the pool.
A special watertight chamber can be constructed to accommodate the submersible pump, or alternatively a large container, such as a dustbin, can be sunk into the ground. Whichever method is used, the water it contains must be deep enough to cover the pump entirely. It must be connected directly to the basal pool so that the water drains continuously into the sump, from where it will be pumped back up to the outdoor wall fountain spout.
This arrangement, although a little more elaborate to construct, makes a much finer job than simply placing the pump in the pool for all to see. Furthermore, the discharge pipework and the armoured cable supplying electricity to the pump can be readily concealed beneath the ground.
The wall to which the fountain is fixed can also present problems. If it is of old brick, water constantly splashing on to it, which is inevitable with even the most carefully contrived water jet, may cause deterioration or unpleasant staining. In this situation, it would be worth making a splashback, which, in most cases, need be no more elaborate than a neatly rendered area that can be designed to enhance the feature:
Regardless of type, installing an outdoor wall fountain is always a matter of innovation, the method being dependent upon individual circumstances. If a wall is to be constructed for the feature, make sure that it is of the cavity type. This will solve many of the difficulties, since the cables and pipes can be neatly concealed in the cavity.
If a cavity wall already exists, installation should be relatively simple. Knock a hole through the face of the wall at the point where the pump delivery hose will be attached to the spout. Then knock a second hole into the wall, just above the edge of the pool, using a plumb line to ensure that it is directly below the first. Feed a stout length of cord into the wall through the top hole and pull its end from the lower hole. Tie the string to the pump delivery hose and pull it up through the cavity until it can be extracted at the top.
Connect the hose to the spout and fasten it to the wall, using rustproof screws and wall plugs. Then reinstate the lower hole in the wall, hiding the inlet hose and pump with a small plinth structure surrounded by suitable plants. In such circumstances, semi-evergreen and evergreen submerged aquatics will fit the bill.
A solid wall will create difficulties in disguising the discharge pipe from the pump. The pipe will either have to be threaded through to the rear, or run in a channel cut into the face of the wall, which should be made good with mortar. However, the latter option will only be effective if the wall is rendered and painted, otherwise the work will leave an ugly scar on the wall.
Although many spouts are designed to be mounted to the face of the wall, others have to be built into it. Obviously, this should ideally be done at the time the wall is constructed, although with care, it may be possible to create an opening, set the spout in place, then fill in around it with bricks or stones. Considerable skill will be needed to achieve a neat finish, and if you are not a confident bricklayer, this work is best left to a professional, for it is absolutely vital to ensure that it sits vertically within the wall.
The shape and size of the basal pool or bowl will be determined by a number of factors. Of prime importance is that it should be large enough to catch as much of the falling water as possible, for even a modest spout, fixed waist-high, will create considerable splashing. One of the regular maintenance requirements of a wall fountain is the constant topping up with water to compensate for loss through splashing and evaporation. Keeping the falling water within the pool is also important aesthetically and practically, especially if the pool is adjacent to a path. Other considerations that affect the pool’s shape and size are the space available and the role the fountain is to play within the overall garden scheme.
The pool can be raised or sunken, the former being the best practical option for management. It also has the advantage that if you construct the surrounding wall wide enough, you will be able to sit on the coping and enjoy the water feature at close quarters.
It is possible to buy sectional basal pools of reconstituted stone, which are simple to install and good looking. They usually require simply connecting together and sealing, although some incorporate a custom made internal liner.
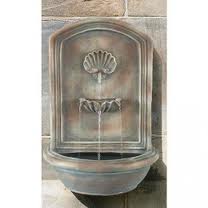
 A variety of pre-formed outdoor wall fountains are available that arc self-contained, incorporating a pump and reservoir. Some are very simple and merely need hanging on the wall, connecting to an electricity supply and filling with water. They produce the most modest of water flows, and may take the form of wall plinths, decorated with characters such as nymphs with water jars, or mythical masks. The smaller kinds should be regarded with caution, for where the dish or basin into which the water flows acts as a reservoir, evaporation problems can be considerable, especially if the fountain is to function continuously. If you can only accommodate this kind of self-contained feature, regular maintenance is vital, the basin requiring constant topping up with water. Unless there are people present to enjoy the feature, the pump should be switched off. If the reservoir of water is depleted and the pump continues to run, there is a danger of it burning out.
Some outdoor wall fountain assemblies are self-contained, in that the circulation of water is linked in an almost closed system, but the amount of water available makes them more practical, albeit more complex to install. The water source is provided by a small cistern, which must be readily accessible, but disguised. It is best hidden at the base of the wall, in a hole in the ground beneath a paving slab, or behind the wall where it may be obscured by planting. The last is preferable, especially if it can be placed in a box attached to the wall, for this will allow it to be positioned opposite the fountain outlet, removing any problems that might occur with a high lift.
Although functional, the self-contained wall fountain is not as satisfactory as a proper wall mask and basal pool, and should not be countenanced when sufficient space is available for such a feature. However, in confined areas and modest outdoor living spaces, where room is at a premium, it can be an invaluable investment.
1. Use a plumb line to accurately relate the inflow pipe to the outlet and drill a hole through the wall. Accuracy at this stage will ensure that installation of the pump hose is straightforward.
2. Feed string through the upper and lower holes in the wall. Attach the pump hose and gently pull. Do not detach the string until the hose has been firmly secured to the wall.
3. Connect the hose outlet to the wall fountain and then securely screw the unit to the wall, using wall plugs and rustproof (brass or zinc) screws to ensure stability.
Copyright © www.100flowers.win Botanic Garden All Rights Reserved