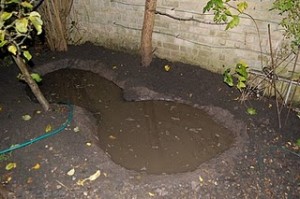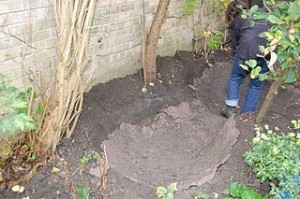


In gardening, modern thinking is that all that is natural must be the best. The whole concept of being environmentally conscious has spread throughout the garden, and has even extended to the area of water gardening. The logical outcome of this is that many gardeners have become interested in constructing ponds wholly from natural materials; in this case, puddled clay.
 Using puddled clay is the traditional method of creating a pond. However, it must be realized that clay-puddling is a labour-intensive task fraught with problems. Moreover, the finished pond will require constant maintenance to ensure that it remains watertight.
Obtaining the right kind of clay is the first requirement. This need not be from any particular source, but is should have specific qualities of malleability. To test whether a clay is likely to be suitable for lining a pond, take a sample, remove any extraneous material, and roll it in the palm of your hand. If the clay is usable, it will be pliable and rather like modelling clay. If it is dry and crumbly, or shows definite cracks when rolled around in your hand, even when damp, it will be unlikely to form a watertight seal.
The excavation for a puddled clay pond is prepared in much the same way as one that will be lined with concrete. Thus, it must be 15cm (6in) larger all round than the finished pond size, this thickness of clay being necessary to guarantee a good seal. The pond can be of any configuration, but it will be easier to construct if any curves are gentle and sweeping, acute angles being avoided. The sides of the pond should slope at an angle no greater than 45 degrees, otherwise the clay may slump.
For the most part, a local clay that conforms to the simple rolling test is likely to be the most satisfactory for the home gardener. However, there are bentonite clays that have been especially prepared for puddling water features. They are not commonly available to the amateur gardener because their application is somewhat specialized, but if you intend employing a contractor, rather than constructing the pond yourself, they are certainly worth discussing.
There are both sodium and calcium forms of bentonite clay. These are available as a powder and, when mixed with an existing heavy soil or clay base, swell to produce an impermeable material. The sodium version swells to approximately 15 times its volume, the calcium type to eight times.
If it dries out, sodium bentonite clay will swell up again when wet, but the calcium form will not.
Such clays should only be used for a large pond. Anything smaller than 1.8 x 2.4m (6 x 8ft), with a maximum depth of less than 1.2m (4ft), can create difficulties, although not in the actual application process. Problems occur because chemicals seep from the clays and can prove toxic to fish in a small volume of water. To minimize this, even in a larger excavation, spread soil over the pond floor and marginal shelves.
When using this traditional method, calculating the quantity of clay you require can be difficult. Up to a third of the volume of clay delivered will be air, which will disperse once water is added. Therefore, to estimate the amount of clay that you will need for puddling, multiply the thickness you intend using by the area to be covered, then increase the result by a third.
Once the excavation has been prepared, dampen it with water, then spread it with a generous layer of soot, ash or lime. This will act as a deterrent to earthworms, which have the irritating habit of puncturing the clay lining and drowning themselves in the water beyond.
Prepare the clay by adding sufficient water to make it sticky. Place a board on the floor of the excavation from which to work and, moving backwards from one side of the pond to the other, begin applying the puddle. The simplest method is to press it on to the soil by hand, wearing a pair of strong rubber gloves.
While you work, make sure that the clay already placed is kept moist. Use a watering can fitted with a fine rose to apply a gentle spray and, if available, spread damp sacking over the puddled area to reduce evaporation. Keeping the puddle
Although generally only used for large ponds and installed by experienced contractors, the bentonite blanket is a fairly recent innovation that creates the benefits of puddling without some of the heartache. It comprises a specially-manufactured form of natural sodium bentonite, which is supplied in a pre-hydrated impermeable state as part of a geotextile blanket. This is installed rather like a pond liner, but swells on contact with water to become an impermeable harrier. It is also self-healing, so if you happen to push a garden fork through it, it will seal itself.
Damp is absolutely vital, so choose a dull day on which to undertake the task, as this will also minimize evaporation.
Apply the clay in two or three layers, rather than attempting to lay the whole lot at once. It is much more difficult to obtain a consistent lining with a single application. The disadvantage when applying several layers is that you have to work from a fairly constrained position on a board placed on your previous work. Successful puddling is not an easy task.
Once the puddling process has been completed, spread soil over the floor and marginal shelves. Water can then be added carefully. To prevent the puddle from being disturbed, lay the end of the hosepipe on to a plastic bag on the floor of the pond. When the pond is full, look carefully for any streams of air bubbles that may indicate an incomplete seal. Initially, there may be many, as pockets of air will have been trapped in the soil and the surface layer of clay. If bubbles persist in any spot for more than 24 hours, it is likely that there is a problem, which should be investigated immediately.
Throughout the life of a puddled pond, it is vital to maintain the water level at the top of the puddle. Any exposure of the clay to the air is likely to result in cracking and leakage. The ill-thought out establishment of plants that may crack or pierce the puddle is also a potential problem, particularly in a situation where an informal wildlife pond is proposed and more invasive species of aquatic plant may be grown. In such circumstances it is sometimes possible to isolate them within profiled features by creating lined sections filled with soil from which they cannot easily escape. If these are associated with adjacent deep areas into which the plants cannot establish, then control is reasonably complete.
 1. Mark out the area for the pond with pegs, then excavate to the finished size of the pond, remembering to allow for any marginal shelves. Dampen the soil with water.
2. To prevent earthworms from puncturing the clay puddle (and drowning themselves in the water), dress the surface of the excavation with soot, ash or lime.
3. Prepare the clay by adding sufficient water to make it sticky and, working backwards from a board, apply the puddle. Press it on to the soil by hand while wearing strong gloves.
4. As work progresses, cover the puddled areas with damp sacks and moisten them regularly, using a watering can fitted with a fine rose, to prevent the clay from cracking.
5. Apply the puddle in two or three layers for the best result. Make sure that the clay is kept damp throughout. Once puddling is complete, spread soil over the floor and marginal shelves.
6. Finally, fill the pond with water by placing the end of the hose on a polythene bag placed on the floor of the pond to ensure that the flow of water does not disturb the puddle.
Copyright © www.100flowers.win Botanic Garden All Rights Reserved