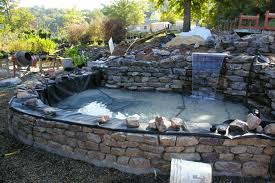


Once the concrete has set, you can construct the walls, trapping the polythene membrane between the inner and outer skins as they are built. Although laying concrete blocks and bricks requires skill, it is not beyond the capabilities of the amateur, provided care is taken. Use a simple running bond, each block or brick being overlapped by half of the one above. Build up the corners first, using a spirit level and a set square to ensure that they are vertical and true right angles.

All block and brickwork must be laid so that the faces of the walls are vertical and the individual courses truly horizontal with uniform mortar joints. This may not be particularly easy for the newcomer to achieve, but constant use of the spirit level will help. Moreover, strings can be stretched between the corners to indicate the top of each course.
Another easily made aid is a gauge rod, a wooden batten marked off to indicate several courses with an allowance made for mortar joints between them. Generally speaking, the joints should be about 1cm (3/8in) thick.
After rendering the inner face of the walls, the coping should be put in place to finish the structure. The result will be a neat and watertight construction for a permanent raised pond. A waterproof sealant should be applied to the walls in order to prevent the escape of free-lime into the water.
When incorporating a pre-formed pond in a brick surround, it is only necessary to construct concrete strip foundations for the walls. These should be about 20cm (8in) wider overall than the thickness of the walls and about 10cm (4in) deep. When the concrete has set, the pond should be placed in position and its outline marked on the foundations in a similar manner to that used when setting a pond in the ground. Using the marks as a guide, you can build the walls, leaving enough room around the pond to permit it to be backfilled. Again, use sand or pea gravel for this purpose, as you would with a pond in the ground. Then the edge can be finished and capped.
The disadvantage of this method is that the wall and capping create a rather broad edge at the top. While this may be perfectly acceptable with a large pond, this is often not the case with a small structure. In this case, it is better to secure the pond in position, then build the walls closely around it. This secures the pre-formed pond within the walls and makes the edging a relatively simple brick overhang.
If a liner is to be used within a brick or block enclosure, proceed in the same manner as when using a waterproof render and polythene membrane, but omit these from the structure.
Once the wall is nearing completion, the liner can be installed, its edge being trapped beneath the coping stones or a final row of bricks. To prevent any abrasive damage between the liner and the rough masonry, secure fleece or geotextile matting to the surface of the brickwork, using an industrial adhesive.
As an alternative, an attractive raised liner pond can be constructed using timber. This requires a level base slightly larger than the pond’s overall dimensions. Although the timber must be treated with preservative and can be laid directly onto the ground, if the base is concreted this will further reduce the likelihood of the timber rotting.
Such a raised pond can be made from old railway sleepers, although any clean timber with a minimum cross-section of 10 x 15cm (4 x 6in) can be used. Cut the timber to size, carefully notching the ends to form halving joints. Use a set square to ensure that the corners of the structure are at right angles, then fasten them together using dowels or rustproof screws. Make sure that each length of timber is level before positioning the next. Build the timbers up until the desired height is achieved.
The interior of the wooden structure can be lined with fleece to prevent any damage to the liner. Simply tack this to the timber. Then lay the pond liner in place, making substantial folds in the corners if the liner has not been welded to the required shape. Rubber liners are unquestionably the best, but both PVC and LDPE can be used to good effect. Secure the liner either by trapping it beneath the uppermost timbers, or by nailing narrow wooden laths around the top, just above the proposed water level.
1. Mark out the area of the pond with pegs and excavate a foundation for the retaining wall about 10cm (4in) deep and 10cm larger all round than the external dimensions of the pond.
2. Place some crushed hardcore into the base of the foundation trench. Finish off with a level layer of concrete of the same mix as that used for a concrete pond set in the ground.
3. Build up the walls starting from a corner and use a traditional English bond. The wall must be both level and upright. Check levels regularly with a spirit-level.
4. To prevent liner damage from abrasive brickwork, secure fleece, geotextile matting or polystyrene sheets to the surface of the brickwork, using an industrial adhesive..
5. Install the liner, taking care to fit it neatly to the corners. A welded rubber liner is the best option. Turn the liner over the top edge of the brickwork so that it can be secured.
6. Finish the top of the wall with coping stones, or with a final row of bricks, bedded on mortar. The top edge of the liner will be trapped beneath this, just above the proposed water level.
Copyright © www.100flowers.win Botanic Garden All Rights Reserved