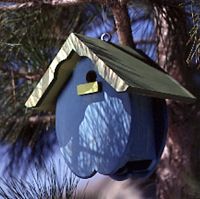


Old-fashioned paint colors help age this birdhouse, which is patterned after a vintage find.
continue reading below All the little birds will want to make their homein this antique-inspired birdhouse.
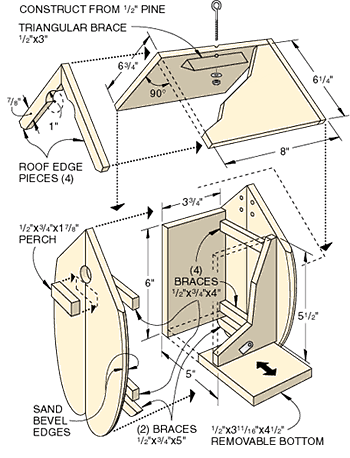
The front and back panels are cut down the middle and braced together, purely for character's sake. A removable bottom makes the birdhouse easy to clean, purely for function's sake.
Skill level: Your skill level should include experience with table saw, jigsaw, and a drill.
Cost: About $20 for building/finishing materials.
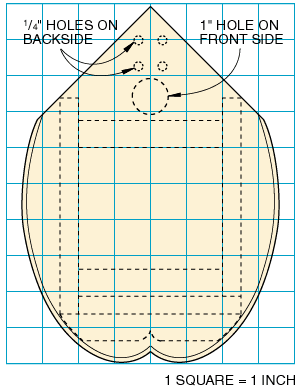
1. Cut the pieces. Copy the pattern to scale on graph paper; cut out. Trace pattern onto wood. Use jigsaw to cut two pieces -- one for the front and one for the back. Use table saw to cut down the middle of each piece. Sand bevel edges.
2. Use table saw to cut and rip two side pieces, two roof pieces, bottom piece, perch, and six braces. Sand the edges of the two 5-inch braces to match the curve of the birdhouse front and back.
3. Use table saw to cut and rip four roof edge pieces. Use jigsaw to make the decorative half-moon cut on one roof edge piece, as shown. Blunt cut the bottom edge. Use it as a pattern for the three remaining pieces. Set the table saw at 45 degrees to cut the triangular roof brace.
4. Assemble the birdhouse. Glue and nail braces to front and back pieces. Drill entrance hole on front piece and air holes on back piece. Glue and nail perch. Align sides with front and back; glue and nail.
5. Glue and nail two roof pieces together, triangular roof brace to roof pieces, and roof edge pieces to roof. Drill a 1/4-inch hole through roof and triangular brace; install eyebolt. Glue and nail roof to house. Install the metal clip with the wood screw. Insert bottom piece.
6. Finish the birdhouse. Set nails. Fill holes with surfacing compound. Sand; wipe with tack cloth. Paint the birdhouse body blue, the roof top and edges green, and the perch and the underside of the roof yellow; let dry. Top with polyurethane.


Copyright © www.100flowers.win Botanic Garden All Rights Reserved