

Who doesn’t like free plants? Air layering plants is a method of propagation which doesn’t require a horticultural degree or fancy rooting hormones or tools. Even the novice gardener can gather a few tips on the process and have a successful outcome. Read on for more info and some easy plants on which to try the process.
Plant propagation may be accomplished in numerous ways. Seeds are the simplest method but often maturity will take months or even years. Additionally, plants started from seed are not always identical to the parent plant. In order to ensure an identical copy, you need the genetic material. In other words, you literally use the plant itself. Layering propagation will produce genetically parallel new plants which will carry all the characteristics of the parent and one of the most popular forms of layering is air layering.
 Of all the ways to create another plant, air layering plants is a simple, easy method. What is air layering? Air layering propagation is a process that often occurs naturally. In the wild it happens when a low branch or stem touches the ground and takes root.
Because it is an asexual process, the genetic material is directly transferred to the newly rooted stem, which may be cut away from the parent to start a new plant.
To learn how to air layer, you need to consider how to get the plant material to root. Each plant is different and responds differently to the methods.
Air layering plants requires a moist environment for aerial roots to form. Most plants can be air layered and, even if no rooting takes place, the original plant is not damaged by the process since you do not remove the donor material until it has produced roots.
Herbaceous tropical indoor plants and woody outdoor ornamentals are good candidates for air layering and may include:
Nut and fruit producers like apples, pears, pecans and citrus are often air layered too. The best plants for air layering using the simple technique would be:
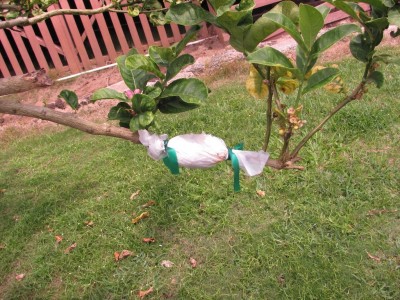
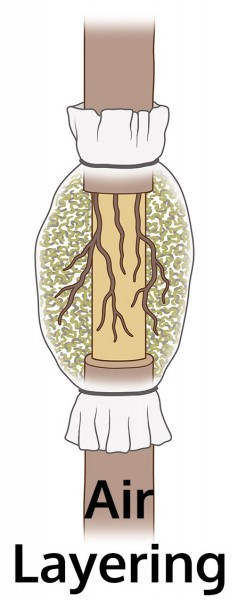
Air layering is pretty simple. You need moist sphagnum moss to wrap around a wounded section of the stem. Wound an area below the node with an upward 1-inch slash. Wedge a toothpick or small piece of wood into the cut to keep it from closing, then wrap the moss around the cut and secure it with floral ties or plant twine. Cover the entire thing in aluminum foil to prevent sunscald and plastic wrap to conserve the moisture.
The actual time for any plant to produce roots will vary but will average a couple weeks to a month. Once you have roots, remove the plant material and pot it up as you would any plant and enjoy.
Learn About Fertilization For GreenHouse Plants
What There Is To Know About Organic Horticulture
Verticillium wilt: how to diagnose it, what to do about it
What Is A Swale: Learn About Swales In The Garden
Leaf Identification – Learn About Different Leaf Types In Plants
What Is A Viroid: Information About Viroid Diseases In Plants
Plants For Pollinators: Learn About Pollinator Friendly Plants
What Is All Of The Buzz About Organic Gardening?
Toxic Garden Plants – Learn About Poisonous Garden Plants To Look Out For
What Is An Olla: Learn About Olla Watering Systems
Growing Pitcher Plants: Learn About The Care of Pitcher Plants
Do Pitcher Plants Bloom: Learn About Pitcher Plant Flowers
Spider Plant Gnats: What To Do About Fungus Gnats On Spider Plants
Copyright © www.100flowers.win Botanic Garden All Rights Reserved