

(Editor's Note: This article was originally published on April 2, 2007. Your comments are welcome, but please be aware that authors of previously published articles may not be able to respond to your questions.)
Double digging is so named because trenches are dug at double the depth of a common spade or shovel. Originated by the French in the late 19th century, this technique is one of the oldest --and best -- methods for creating raised beds with good drainage and well-aerated, healthy soil.
You'll need a heavy square-edged shovel and a strong spading fork for this project. Make sure the soil isn't too dry or too wet before you prepare to dig, then mark off the area to be worked.
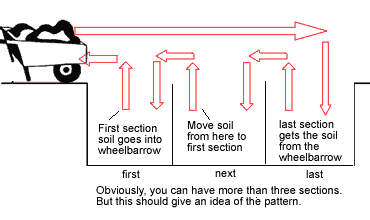
 For the first row, dig a trench one shovel length deep and two wide, placing the squares of turf in a wheelbarrow as you go. Use a spading fork to loosen the soil at the bottom of your first row, until the depth of the trench is about 12 inches. Add about 1 inch of compost to the row.
Dig a second trench of the same size alongside the first. As you dig, flip the turf and topsoil into the first trench, grass-side down, if applicable. Again, loosen the soil at the bottom of the new trench and add a small layer of compost.
You can continue this dig-and-flip progression for the entire length of your planned garden bed. When you get to the last row, use the turf and topsoil dug up and set aside from the first row. Just be sure to add compost in each row to boost the soil's fertility and macrobiotic activity.
Thankfully, you won't need to repeat this technique every year, as your double-dug beds should last for a couple of growing seasons, at least...which is probably more than you can say for your aching back.
Copyright © www.100flowers.win Botanic Garden All Rights Reserved