

This is the second article in a series on cold frames. In the first, I introduced some common and not-so-common designs for building a cold frame. This article will get you started on where to locate your cold frame, and some of the many ways you can put it to use to meet your particular gardening needs! To read from the beginning, see the first article, here:
Building a Cold Frame to Jump Start your Spring Garden
The basic premise of a cold frame is to absorb warmth from the sun all day, and then retain that heat overnight to prevent the temperature inside from dropping below freezing. As the real estate moguls will tell you, the most important consideration is location, location, location!
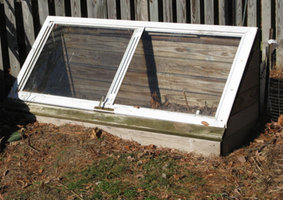
If at all possible, place it in a sunny location against a south wall. If this is not an option in your garden, you can also stack bales of straw on the northern side of your cold frame, to provide some insulation and a barrier from those cold north winds! If you have one of the storm window varieties, be sure to face the lower side, or front, toward the south, to maximize the amount of sunlight it can absorb throughout the day. For the hoop-style frame, I'll place the long sides running east-west.


Cold frame with Storm Door lid,
by SallyG
For extra insulation, you may set the cold frame down into the soil a few inches. Depending on how you plan to use the cold frame, you can excavate a few inches of soil from the inside of the frame. This leaves the plants inside better insulated and protected from the cold air and wind temperatures.
Good drainage is of the utmost importance! Either place your cold frame on a gradual slope, or provide drainage away from the cold frame so moisture doesn't pool in the cold frame after a rain and rot the roots of the plants inside. This is especially important if you are planting directly into the soil inside the frame. If you are setting potted plants or flats of seedlings inside, a nice layer of gravel or sand in the bottom will help keep them up off the damp ground in a rain, and provide the necessary drainage.
If you are at the borderline of a hardiness zone, and are concerned about losing precious plants, you could use your frame to overwinter those semi-hardy plants and cuttings. Sometimes the few degrees difference in temperature provided by the retained solar energy can mean the difference between frost-damaged leaves and healthy plants!
An exterior-rated rope light, a heating cable, or an exterior trouble light with a 60-watt bulb can add additional warmth to your frame for the coldest nights. I saw online an explanation for how to line a wooden coldframe with chickenwire, and weave traditional (not LED) exterior Christmas tree lights throughout to provide even heat to the entire cold frame, without the hot spots that can be caused by a single bulb. A quicker, cheaper, and definitely more low-tech alternative is to cover the cold frame with old blankets and sleeping bags at night during cold snaps late in the spring. Other options are to set large stones, cement blocks, or gallon jugs of water inside the cold frame to absorb heat throughout the day, and emanate it back into the cold frame at night.
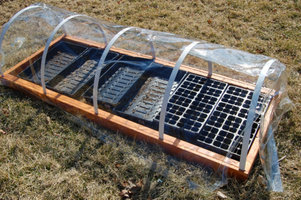
My mother, Dave's Garden member EdyHill, built the hoop-style frame pictured above for my Christmas present. By using a cold frame, she is able to start her seeds indoors 4 to 5 weeks earlier than she would have without a cold frame. The extra heat it provided allowed her to set her plants outdoors almost a month early, giving her a headstart on production and harvest!
Depending on the needs of the gardener, there are many different ways you can use a cold frame. Some people plant directly into the soil inside the cold frame, using it as a nursery area to start plants for early planting. Many vegetable gardeners use them to get a jump-start on garden vegetables that are more tolerant of cold, such as spinach, lettuce, and broccoli, and peas. If you choose to do this, place the cold frame in the garden or other desired location a week or more before you intend to plant, to give the soil under it a chance to warm up sufficiently. Be aware that it may take several weeks to warm the soil if you are starting with frozen soil, and have cloudy, grey days. I'd suggest using a simple thermometer inside the frame to register the highs and lows. You'll be surprised at how warm it gets, even on cold days. Just think, you could be harvesting fresh salad greens shortly after the robins return to search out the first worms of spring!
Another common use is for hardening off flats or pots of seedlings that are accustomed to indoor temperatures, by placing them inside the cold frame before exposing the seedlings entirely to the harsher outdoor climate. To do this, first move them into a closed cold frame. After a couple of days, weather permitting, begin to open the cover slightly to allow the temperature to regulate with the outdoor temperature, and seal it back up at night. Continue to gradually accustom them to the outdoor temperatures over the course of 7 to10 days. This is not the time to get in a hurry; after you've carefully nurtured the seedlings inisde under growlights for weeks or months, you'd hate to lose them by shocking them with cold temperatures too abruptly during hardening-off!
This sounds like a lot of work, but believe me, opening and closing a cover morning and night is much easier than carrying armloads of flats in and out every day! I've done that, and I'm lucky if half of them still have their markers and their seedlings by the time I've finished battling the screen door, the kids, and the pets who are determined to either escape through the open door, or sample the tasty greens I'm sliding in at their eye-level.
I'd like to extend my thanks to yardqueen1948 and Sally G. Miller (sallyg), for allowing me to include their pictures of cold frames. All other images are my own.
I'd also like to extend a very hearty and well-deserved thank you to my mother, Edy Hill, who both built my cold frame and acted as my collaborator and chief resource for this article. Mom, you are my inspiration!
For some great pictures of a cold-frame in use, see this article:
Wintering of Plants, Emphasis on Cold Frames
For some innovative ideas on how to provide an extra few degrees of heat to your cold frame, without plugging in a thing, read:
Cheating the Weatherman: Extending your Season with Mini-Greenhouses and Cold Frames by Glynis Ward (girlgroupgirl)
Do It Yourself article: Keep Your Plants All Winter with a Cold Frame
For details on hardening off plants before planting outside, see this excellent article:
Seed Starting 101: Hardening off Seedlings Before Planting Out in Your Garden by Jill Nicolaus (Critterologist)
Happy Gardening!
Dealing With Pests In Your Vegetable Garden
Start Your Garden Nowadays With The Basics Of Vegetable Gardening
Get Creative With A Garden Design
Get The Garden Of Your Dreams With These Tips
Get A New Start With A Professional Garden Greenhouse Enterprise
Start Your Garden Today With the Basics of Vegetable Gardening
Get Inspired With These Unique Garden Tips
Spruce Up Your Garden With These Handy Tips
Grow Your Gardening Skills With Dobbies Garden Centre
Beautify Your Garden With This Excellent Information.
Perk Up Your Garden With These Handy Tips.
Get Your Plants Off To A Great Start With Organic Nutrients
Get a Head Start on Planning Your Garden, Even if It’s Snowing
Copyright © www.100flowers.win Botanic Garden All Rights Reserved