

I couldn’t afford to have the stumps dug up and surely couldn’t do it myself. My only choice seemed to be to hide them in a raised bed. The only technique I knew was to dig out all the “green stuff” and grass, edge the area with bricks or stones, and fill it in with topsoil. It took 2 full summers’ of weekends to build 2 beds of less than 100 square feet each, and I was about ready to give up gardening forever!
Then someone on DG mentioned lasagna beds and I stored away the sketchy details somewhere in the recesses of my mind. The next fall I had a bounty of leaves and I remembered something about laying down newspaper covered with leaves (which was partially correct). Just one afternoon spent putting down newspapers and hauling bags of leaves to cover them, and I was finished.
Well, it isn’t really that simple, although close. However, the following spring I actually had an area that resembled dirt and I could plant in it! So I decided to look up the suggested way(s) to build lasagna beds, which is just a raised bed built in layers like a lasagna. There is no wrong way to build a lasagna bed, some ways just work better or faster than others. Since then I have built several lasagna beds at the various places I have lived and all have developed into a good growing bed over heavy clay soils. The principle behind all this is decomposition. All living things (for the garden, it’s mulch, leaves, peat, grass clippings and vegetable clippings, etc) contain some basic building blocks such as starches and proteins. Eventually all die and become food to multitudes of bacteria, fungi, insects, and worms. In the process, these once-living materials are transformed into nutrients for plants. [1] Most of us know something about composting, and lasagna beds are basically compost piles we nurture closely to hurry them along. Some people plant in lasagna beds right away while others wait a season for more decomposition. It is largely a matter of choice, and a lasagna bed is an ongoing work in process.
The first step is gathering newspapers. LOTS of newspapers. Do not use the inserted slicks as they take longer to decompose. While you are accumulating newspapers, try to also gather organic materials: wood chips, bark, grass clippings, leaves, straw, hay, manure, coffee grounds or whatever you have available. You might want some wood chips or bark mulch for pathways if the lasagna bed will be large. Next, lay out your bed in the desired shape and location. It would be helpful to mow the area as short as possible but this is a step you may easily skip.
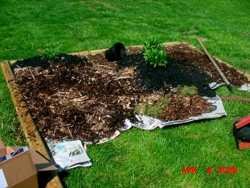
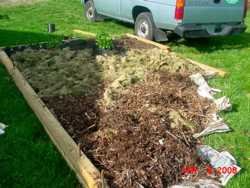
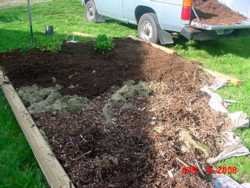
Now comes a layer of newspaper. I generally make mine 8-10 sheets thick, overlapping at least 2 inches to prevent the grass or weeds underneath from growing through the layers. Wet the newspapers as you go along. I don’t do an area any larger than 4’ x 4’ until I get some mulch on top to hold it down if it is windy. In the bed I am building in these photos, I am using coarse wood chips/debris from the tree trimmers as my first layer over the newspapers. This layer is about 6-7” thick.
The next step is adding additional layers. Ideally you want a ratio of 30:1. That’s 30 parts ‘browns’ (carbon-rich materials like leaves, chips) to 1 part ‘greens’ (nitrogen-rich materials like grass clippings, plant and vegetable trimmings). One caution about grass clippings: If the layer is too thick it will turn to mush and smell foul. I let my clippings dry on the ground a day or 3, and use light layers alternating with something like peat moss. If you have horse manure available for a layer, make sure it is well composted IF you are going to plant in the new bed this season. If it is not fully composted, it will burn new roots. In any case, other than my lower layer that’s several inches thick, the remaining layers I put down are not over 1”-2” each. Keep layering until the bed is about a foot thick. It WILL compress! (Pat Lanza, author of Lasagna Gardening, recommends a thickness of 18 to 24 inches.) As I near the top I add topsoil when I have it available. If I don’t have any topsoil AND I want to plant immediately, I dig a hole in the layers and add some bagged soil around each plant. Keeping the bed moist (but not soggy) will enhance the decomposition process. The final layer this year will be mulch, which will decompose into the bed by next year when I will add another layer of mulch. Year by year the soil composition of the bed increases as you feed it more compost. You will find that adding another layer of mulch/compost 2-3 times over the growing season increases the microbial activity in the bed.
If you are not going to plant in your new bed this year, or at least soon, you can ‘cook’ it by covering the bed with black plastic anchored around the edges. Be sure the layers are thoroughly wet before covering. The sun on the black plastic will help break down the damp layers faster.
Congratulations. You have just built a great weed-free planting bed!
Footnotes
[1] http://www.kidsgardening.com/growingideas/projects/sept04/pg1.html
Photo Credits: All photos are mine.
Copyright © www.100flowers.win Botanic Garden All Rights Reserved