

When I started working at Gardener's Supply in the 1990s, my Vermont backyard was pretty green—with grass. Today, there's just a tiny bit of the original lawn left. Most of the available space has given way to trees, shrubs, perennials, annuals and stonework. Watch a slideshow of my garden in Burlington, VT.
In addition to my work at Gardener's Supply, I work in the gardening division at Church Hill Landscapes. In that role, I maintain dozens of gardens and learn a lot in the process. I believe that all gardening is good gardening.

Photo: National Gardening Bureau
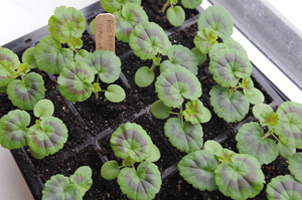
IF you're a gardener looking for hope in the middle of an icy January day, there's no better balm than a geranium seedling. The tiny leaves have the characteristic rounded shape, with contrasting bands of maroon. Aw, shucks they're cute! But the power--the thing that tells you spring is coming and gives you hope – is in the smell, that one-of-a-kind geranium fragrance. Even in the dead of winter, those tiny leaves smell like summer on the porch.

Geranium seedlings, before being "potted up" to larger containers.
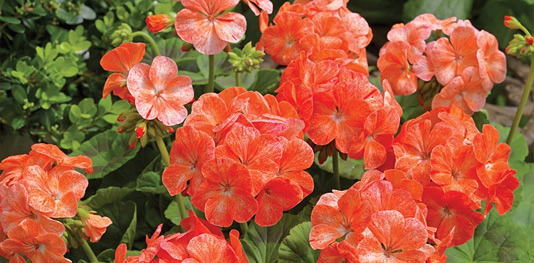
Many gardeners know about starting geraniums from cuttings. It's a great way to share treasured plants, and it feels thrifty. And gardeners love things that are thrifty. But if you start plants from seed, you get to choose from a range of colors: bright red, scarlet, bicolors, orange-salmon, coral, pink, white and lavender. And instead of feeling thrifty, you feel clever.
"There is no trick to growing geraniums from seed," says Valerie Ryan, who grows dozens of seedlings each year. "Patience and care is all that is needed." She usually grows 40 seedlings at home, but this year, she's planted another 200 that grow under lights in our Burlington, VT, call center, where she works.
Seeds: There is a wide selection available at garden centers and online. The key is to start early: You'll need 12 to 16 weeks to get flowering plants. Some varieties come in to bloom faster than others, so check the seed packets.
Pots and soil: Although you can start seeds in any container with good drainage and sterile "potting soil," it's a good idea to start with a multi-cell tray that's designed for seed starting. "We use the GrowEase system and have had almost 100 percent germination," Valerie says. "Of 200 seeds, only two failed to germinate. For potting soil, use a sterile mix, such as Germinating Mix.
Light: Your seedlings will need light — lots of it. You can get pretty good results in a south-facing window, but it's easier to ensure ideal growing conditions by growing the seedlings under lights.
Fertilizer: Choose a water-soluble plant food, such as Easy Grow.
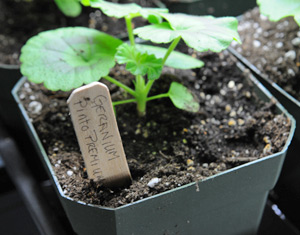
Fill your pots or planting cells with moistened potting soil. The ideal size is about 2-3". Eventually, you will have to "pot up" your seedlings. In other words, you will transplant them to a larger pot once they have about three sets of leaves and the roots have filled the starter pot. Although it might seem wise to start with a larger pot, it's not. Seedlings seem to do better in close quarters.
Place one tiny seed in each pot and cover with a thin layer of moistened soil — just enough to cover the seed. Cover the pots with a piece of plastic wrap or — if you're using a seed-starter — put the clear cover on top.
Place the whole setup in a place that's warm, with bright, indirect light. Geranium seeds germinate best at 75 degrees F., so consider putting them on top of a refrigerator or using a Heat Mat. If the soil surface gets dry, use a mister to moisten it with water.
Watch for germination, which can take as few as three days or as long as four weeks. As soon as you see the first shoots of green, remove the covering and moisten the soil if it looks dry.
Move the tiny plants to a place that gets bright light, with temperatures in the 70s during the day and no lower than 60 degrees F. at night. Although you can grow them on a sunny, south-facing window, grow lights are best. Keep the bulbs no more than 6" above the plants, adjusting as they grow. Leave the lights on for 12 to 16 hours a day.

Once seedlings have been "potted up" to 4" pots, start fertilizing at full-strength.
Begin fertilization at this stage: once a week with liquid fertilizer that's mixed at half strength.
When the plants have three sets of leaves, transplant them to a 4" pot. Biodegradable Cowpots work well, but you can use anything that's about 4". "This gives the roots more room to grow," Valerie says. "Plus, you get more space between the plants, so air can circulate. Crowded plants are more susceptible to disease." Don't get thrifty by reusing old soil, which can harbor pests and disease. Use fresh potting soil, such as our Transplant Mix, which is sterile and drains freely.
Continue fertilizing the seedlings, but mix it at full strength and apply it at the rate recommended on the package. "I like our Plant Health Care," Valerie says.
When frost-free weather arrives, it's time to "harden off" the seedlings. Hardening off is simply acclimating plants to outdoor conditions. Seedlings grown indoors have been coddled — you've been giving them just the right amount of light, moisture and nutrients. Outdoor conditions are more challenging, with fluctuating temperatures and light levels, more variable soil moisture and wind. About a week before you plan to set the seedlings into the garden, start hardening them off. Place them in a protected spot outdoors (partly shaded, out of the wind) for a few hours, bringing them in at night. Gradually, over the course of a week to 10 days, expose them to more and more sunshine and wind.
Copyright © www.100flowers.win Botanic Garden All Rights Reserved