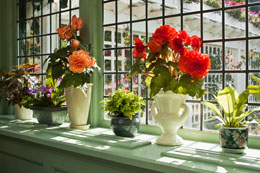
Just because you live in an apartment doesn't mean you can't have a garden! With the rapid growth of cities, a lot of apartment buildings are coming up, which have little or no space for plants. For people living in such places, indoor gardening is a good alternative.

For someone who loves gardening, living in an apartment can be very frustrating, due to the shortage of space. This year, with the weather being so beautiful, a person would be dying to have a garden of their own and cursing the lack of yard space. If you are one such person, starting an indoor windowsill garden is your best bet. Anyone can grow beautiful plants or even fresh veggies if they're willing to put in the effort! Here are a few basic steps to get you started:
Step One - Pots and Containers
A good windowsill garden starts with a good pot or container. The important thing about any container, whether it's a fancy store-bought kind or one you make yourself from a bucket or soda bottle, is proper drainage. The water has to drain from the bottom, otherwise it will pool up and cause all sorts of problems for your plants. You can buy some long plastic pots, drill holes in the bottom, and put some plastic covers on the bottom to catch the water as it drains. There are some wonderful round plastic pots, that have a bottom water collection tray that's removable.
Step Two - Add Potting Soil
The key here is to use actual potting soil. Do
not use soil that's intended for regular outdoor use, as it may contain insects or other creepy-crawlies that you'd rather not bring into your home! It doesn't need to be any super fancy or expensive soil, just make sure the bag says "potting soil"!
Step Three - Add Plants
At this point in the season, it is recommended to buy small plants that have already started growing, as opposed to seeds. Any store that sells garden supplies will probably have some sort of center set up during the spring and summer months, and most of them sell a wide variety of flowers, fruits, and veggies. If you'd rather plant seeds, follow the instructions on the package as each plant has its own unique needs.
Vegetables, leafy greens, and herbs do best, especially if you have a particularly sunny window to put them in. If you are adventurous, you could try tomatoes or cucumbers, but those will require some supplemental lighting. As for flowers, choose a variety that does well in partial shade. If you have pets, especially cats,
make sure your plant isn't poisonous! Tomato leaves are poisonous to cats, so have the plants in a hanging planter they can't reach.
Step Four - Add Food or Fertilizer
Be sure not to use too much! You can overfeed your plants, so use only what's necessary. Each plant has a different requirement for nutrition. So, you must provide the right type of fertilizer for the plants.
Step Five - Place in Window
If you have a south or east facing window, place your plants there. If your only choice is a north facing window, you may need to supplement the little sunlight you do get, with a grow light of some sort. Keep your windows open for ventilation, or to ensure your plants get proper airflow, use an oscillating fan set on low or medium.
Step Six - Add Water and Watch Them Grow!
This is the fun part, of course! Be patient, and adjust how much you water your plants as necessary. Some plants are thirstier than others! An easy, albeit inaccurate, test is to stick your finger an inch or two down in the soil. If the soil is moist, you're good. If it's dry, then it's time to bring out the watering can. A spray bottle can be good for misting the leaves, to ensure they're getting enough humidity.
These are just the basics, of course. You'll want to research the different kinds of plants and their ideal conditions first, so you can adjust their environment accordingly. Planting indoors is well worth the effort. It's not only a fun hobby, but it will alleviate the jealousy you feel every time you walk past a house with a luscious garden!


 For someone who loves gardening, living in an apartment can be very frustrating, due to the shortage of space. This year, with the weather being so beautiful, a person would be dying to have a garden of their own and cursing the lack of yard space. If you are one such person, starting an indoor windowsill garden is your best bet. Anyone can grow beautiful plants or even fresh veggies if they're willing to put in the effort! Here are a few basic steps to get you started: